How Long It Takes to Master Dressing Aids

Last Updated: November 17, 2026
Quick Summary
Most people master dressing aids within a few weeks of regular practice, with fluency often arriving between weeks four and eight. Give yourself short, calm daily sessions of five to fifteen minutes, and the motions become automatic. Mastery means dressing safely without step-by-step thought, not speed or perfection.
The first attempt is the hardest; by day seven the tool should feel less strange.
Practice five to ten minutes daily, and by week four many people dress alone with the aid.
Pants Aid comes in three sizes chosen by underwear waist size, and we suggest sizing down.
If progress stalls for more than a week or two, go back one stage for a few days.
Keep a firm chair or rail within arm's reach and wear stable footwear every session.
How long until dressing feels easy again?
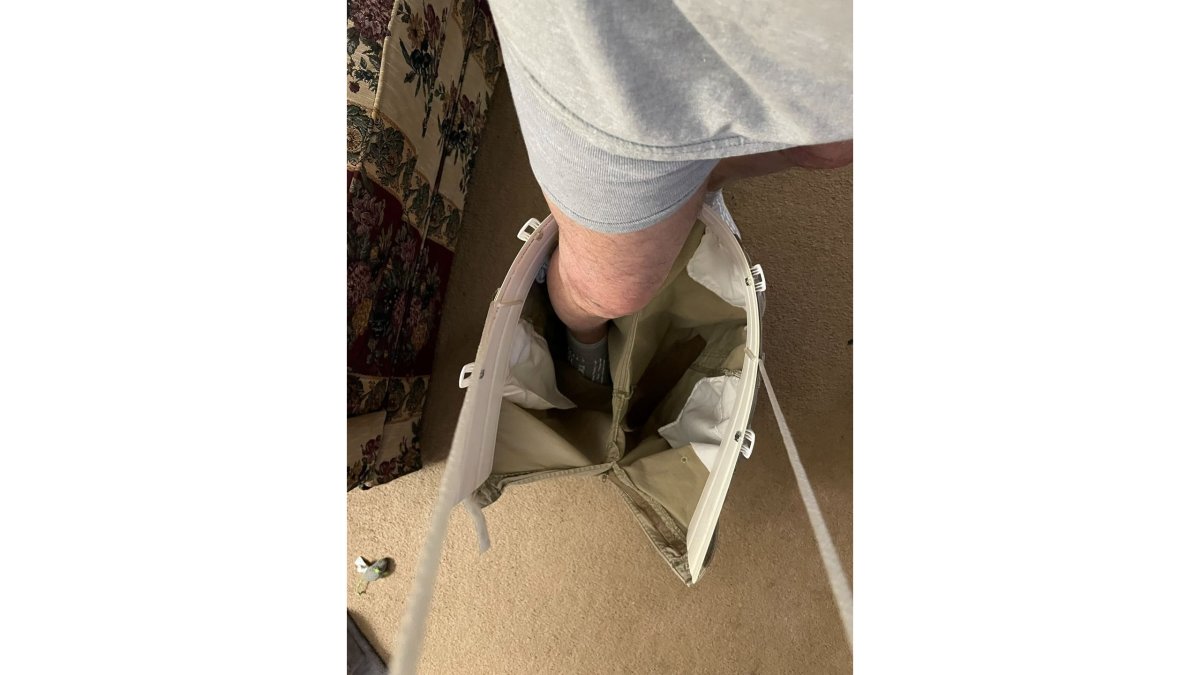
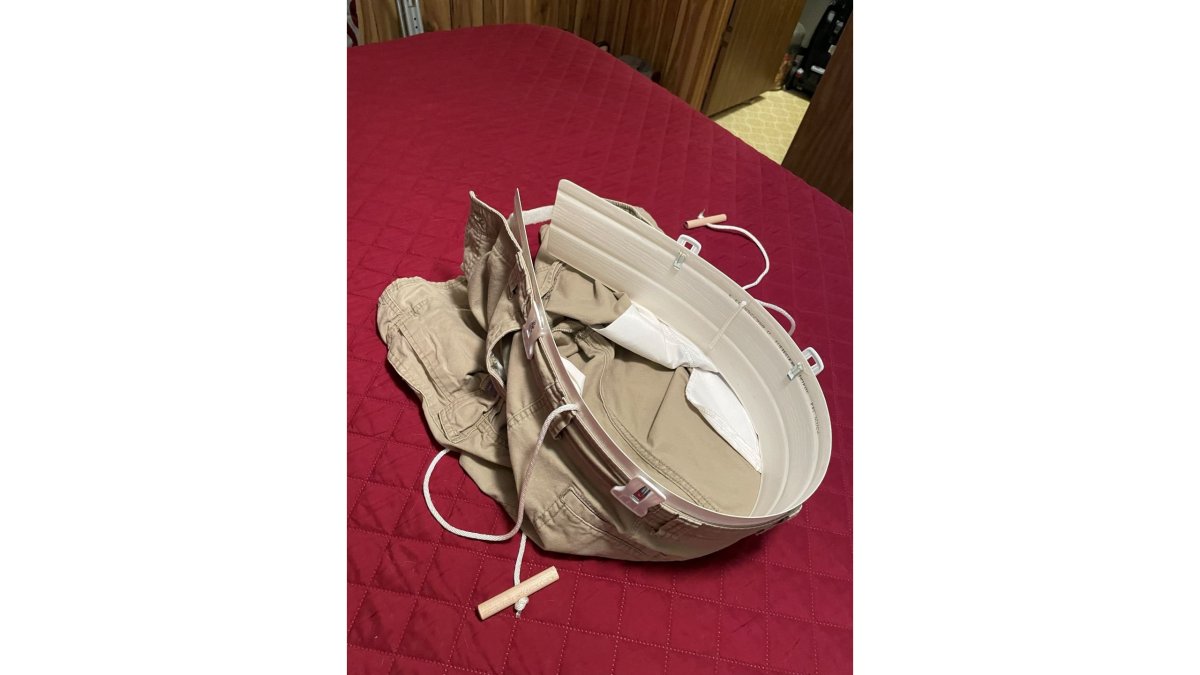
Pants Aid helps you step into pants without bending or strain.
Table of Contents
Why Mastery Takes Weeks, Not Days
Most people expect to struggle with a new dressing aid for a day or two, then master dressing aids and glide through their morning routine. That expectation is the first thing to set aside. Learning to master dressing aids is a skill, and like any skill, it builds through repetition. At Pants Aid, we tell customers the same thing we would tell a friend: give yourself a few weeks of short, calm practice, and the motions become automatic.

Here is why the calendar matters. Dressing involves balance, grip, reach, and sequencing, and a new tool asks your body to combine those in unfamiliar ways. Your hands need to learn where the loops and handles sit without looking. Your hips and knees need to trust the new path into a pant leg.
None of that happens in a single morning. But it does happen faster than most people fear.
The good news: mastery is not a talent you either have or lack. It is a routine you rehearse. Below, we break down a realistic timeline, a week-by-week practice plan, and the signs that tell you progress is real.
What Affects How Fast You Learn
No two people learn at the same pace, and that is normal. Several factors shape how quickly a dressing aid feels natural.
Hand and grip strength. Arthritis or nerve changes in the hands can slow grip learning.
Range of motion. Hip, knee, and shoulder limits change which techniques work best.
Balance and confidence. Fear of falling makes people hesitant, and hesitation slows repetition.
Vision and sensation. Poor eyesight or reduced feeling in the feet means more looking and checking.
Practice frequency. Ten short sessions beat one long one every time.
Prior experience. Anyone who has used a reacher or sock aid before picks up a new tool faster.
A common mistake is judging progress by the first attempt. The first try is the hardest one you will ever have. What most guides miss is that the second week matters far more than the first.
A Realistic Timeline for Mastering Dressing Aids
Most people see the basic skill within a few weeks of regular practice, and fluency often takes longer. That window is broad on purpose.
A simple way to think about it:
Stage | Typical Timing | What It Looks Like |
First contact | Days 1-3 | Handling the tool, learning its parts, no pressure to succeed |
Guided practice | Weeks 1-2 | Using the aid with help nearby, slower than before |
Independent use | Weeks 2-4 | Dressing alone with the aid, still thinking through steps |
Fluency | Weeks 4-8 | Automatic movement, near-normal dressing time |
Watch out: comparing your week two to someone else's week six is the fastest way to feel discouraged. Track your own progress only.
Several factors can shift your timeline. Hand and grip strength, range of motion, balance confidence, vision and sensation, practice frequency, and prior experience with similar tools all play a role.
A common pattern is that the second week matters more than the first. The first attempt is the hardest you will ever have; by day seven, the tool should feel less strange.
What mastery looks like in practice: you can dress yourself with the aid safely, without step-by-step thought, on a normal morning.
If progress stalls for more than a week or two, go back one stage for a few days, then move forward again. And if pain, weakness, or balance gets worse rather than better, talk to your doctor or therapist before pushing on.
A Structured Practice Plan for Dressing Aid for Pants
A dressing aid for pants works best when you learn it in stages instead of all at once. The plan below spreads learning over a month, with short daily sessions. Fifteen minutes a day is plenty, and less is fine on tired days.
Before you start, check the fit. Our Pants Aid dressing device comes in three sizes, chosen by your underwear waist size, and we suggest sizing down: a 35-inch waist pairs with the small, a 45-inch waist with the medium. A tool that fits your body is easier to learn with.
Week 1: Get Familiar Without Pressure
Spend the first week simply handling the aid. No rush, no goal of finishing a full dressing routine.
Hold the tool and practice the grip until it feels secure.
Rehearse the motion while seated, without any clothing.
Watch a demonstration first if you learn well by seeing. A short seated dressing video demo can show you the rhythm before you try it.
Do this for five to ten minutes a day. By day seven, the tool should feel less strange in your hands.
Watch out: if you feel unsteady even while seated, keep a firm chair or rail within arm's reach and practice with a caregiver nearby until confidence grows.
Weeks 2-3: Build the Sequence
Now add clothing and build the full sequence, one step at a time. Practice the same order every session so the pattern sticks.
Set up the garment within easy reach.
Guide the first leg into place using the aid.
Bring the second leg through.
Pull the garment up to a comfortable height.
Check the fit and adjust.
Repeat this sequence daily, seated and steady. Speed comes later. If the garment slips off the aid, slow the pull and keep the fabric gathered rather than stretched. If your grip tires quickly, split practice into two short sessions instead of one long one.
Week 4 and Beyond: Add Speed and Independence
Once the sequence feels familiar, add small challenges. Try dressing at your normal time of day. Reduce the help nearby. Aim for a steady rhythm rather than fast movement.
By this stage, many people find the routine takes only a little longer than dressing used to. If progress stalls, go back one stage for a few days, then move forward again. Safety comes first in every session: keep a firm chair or rail within arm's reach, wear stable footwear, and stop if you feel dizzy or short of breath. And if pain, weakness, or balance gets worse rather than better, talk to your doctor or therapist before pushing on.
How to Use a Dressing Stick and Sock Aid
A dressing stick and a sock aid each solve a different problem. A dressing stick, sometimes called a reacher, extends your reach so you can pull up clothing, push off socks, or grab a garment without bending. A sock aid holds a sock open so your foot slides in without you touching your toes.

For a dressing stick:
Hook the garment and pull it upward in small, even tugs.
Use the hook to push socks off your heel rather than yanking.
Keep the stick close to your body to protect your balance.
For a sock aid:
Slide the sock over the aid's curved shell.
Hold the cords and lower the aid to the floor.
Push your foot in, then pull the cords to slide the sock on.
Full step-by-step directions for use are worth reading once before you practice. Watch out: pulling too hard on the cords can tip your balance, so keep a chair or rail within reach.
How Occupational Therapy Adaptive Equipment for Dressing Speeds Learning
Occupational therapy adaptive equipment for dressing shortens the learning curve because a therapist matches the tool to your body and your limits. That match matters more than any instruction sheet. A therapist can watch you move, spot the step that causes strain, and adjust the approach.
Therapists also teach the small tricks that save weeks of trial and error. They show you how to sequence garments, where to sit, and how to keep your balance while pulling clothing up. If you want to go deeper on technique, this guide to occupational therapy dressing techniques covers the methods therapists use.
Formal instruction is not required for everyone. But if you have significant balance problems, one-sided weakness, or a recent surgery, a session or two with a professional is time well spent.
How to Measure Progress and Define Mastery
Progress is easier to see when you know what to look for. Skip the stopwatch for the first few weeks. Instead, track these signs:
Fewer corrections. You adjust the garment less often mid-sequence.
Less looking. Your hands find the handles without your eyes.
Steadier balance. You reach for support less.
Shorter routine. Dressing time slowly drops toward your old normal.
Less fatigue. The task stops feeling like a workout.
Mastery, in practical terms, means you can dress yourself with the aid, safely and without step-by-step thought, on a normal morning. That is the goal. Not speed. Not perfection.
Troubleshooting and Safety During Practice
Most practice problems have a simple fix. Here are the ones we hear about most.
The garment slips off the aid. Slow the pull and keep the fabric gathered rather than stretched.
You feel unsteady. Practice seated until confidence grows. Review how to put on pants without bending for safer positioning.
Your grip tires quickly. Split practice into two short sessions instead of one long one.
Progress stalls. Go back one stage for a few days, then move forward again.
Safety comes first in every session. Keep a firm chair or rail within arm's reach. Wear stable footwear. Stop if you feel dizzy or short of breath. And if pain, weakness, or balance gets worse rather than better, talk to your doctor or therapist before pushing on.
Learning to master dressing aids takes weeks, not days, and that timeline is a feature, not a flaw. Every short practice session builds the grip, balance, and confidence that make mornings feel like yours again. Pants Aid was built for exactly this: a simple design that helps you step into clothes without strain, three sizes plus custom sizing for a proper fit, and a routine that restores independence and dignity. Get started with Pants Aid and make getting dressed the easy part of your day.
Frequently Asked Questions
How long does it take to learn to use dressing aids?
Most people need two to four weeks of short daily practice to feel confident with a dressing stick or sock aid, and four to six weeks to master a full routine. Progress depends on hand strength, balance, and how often you practice. Ten to fifteen minutes a day works better than one long session per week. If you have arthritis or recent surgery, allow extra time and ask an occupational therapist to check your technique early.
How often should I practice using a dressing aid?
Aim for one short session each day, ideally at the same time, such as when you dress in the morning. Ten to fifteen minutes is enough at first. Stop before you feel tired or frustrated. Practicing daily builds the movement pattern faster than occasional longer sessions. Keep a simple note of what felt easier each week, and take rest days when muscles are sore.
Can an occupational therapist help me master dressing aids faster?
Yes. An occupational therapist can assess your reach, grip, and balance, then recommend the right adaptive equipment for dressing. They show you how to use a dressing stick or sock aid correctly and correct habits that slow you down. A few sessions often shorten the learning period and reduce frustration. Ask your doctor for a referral, or check whether your insurance covers occupational therapy.
What if a dressing aid still feels awkward after a month?
Check your technique first: many people hold the tool too far from the body or rush the sequence. Try a different device type or size, since fit matters. If a dressing aid for pants still feels awkward after four to six weeks of steady practice, ask an occupational therapist to watch you use it. Pain, weakness, or a change in balance can also slow progress, so mention new symptoms to your doctor.

Comments